Home > TestDrive Fundamentals > Sandbox Experiences
Workspace ONE UEM Sandbox Walkthrough
Warning
Sandbox enablement is only available to invited customers. If you’re considering enabling one for a customer, first review Essential TestDrive Sandbox Information.
A UEM sandbox is a personal, unconfigured Workspace ONE UEM tenant where you can create accounts, profiles, assignment groups, configure apps, and manage your own system settings. After the tenant is configured, enroll devices to see the end results.
Before You Begin
You must be an invited customer of an Omnissa employee or partner.
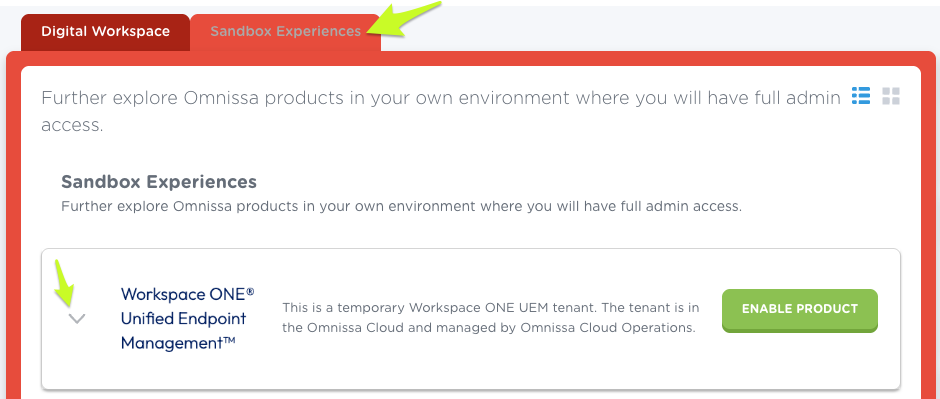
Enable a Sandbox
Log in the the TestDrive Portal with your TestDrive credentials.
Go to My Products > Sandbox Experiences.
| The Workspace ONE Unified Endpoint Management tile provides enablement and tenant information. Click ENABLE PRODUCT. |
 |
| Review and accept the TestDrive Sandbox Terms of Use. |
 |
TestDrive will (1) provision the tenant and (2) create a basic admin account in the tenant.
| You'll know the sandbox is ready when the ‘enable’ button has changed to “LAUNCH”. Expand the tile to display the sandbox URL and your credentials. |
 |
Launch and log in to the tenant and set your PIN and security questions.
You'll have access to a brand new Workspace ONE UEM environment. Your administrator role, Console Administrator, has full administrator privileges, allowing whatever configurations want.
Sandbox Setup
Before using a UEM tenant to manage devices, you must first complete the following:
- Device Root Certificate
- Add users
Device Root Certificate
Before you begin to enroll devices in your Workspace ONE UEM sandbox, verify the Device Root Certificate is enabled.
Log in to your sandbox's Workspace ONE UEM console and go to Settings > System > Advanced > Device Root Certificate. It should already be enabled.
Apple APNs for MDM
In a TestDrive sandbox, APNs has been pre-configured in the tenant.
Android EMM Registration
In a TestDrive sandbox, Android EMM has been pre-configured in the tenant.
Users
Since TestDrive sandboxes are fully configurable, users must be created. The account provided by TestDrive provisioning is a basic administrator account.
Let's go ahead and add a user account. Click on the Accounts button in the left sidebar to open the User menu.
From the List View page, hover the cursor over the Add dropdown, then click the 'Add User' option.
Fill in the required fields and click Save when finished.
The list view will refresh to show the new user has been added successfully.
By selecting the check box next to the user's name you can add a device and manage various group options directly, without having to navigate to the other sections.
Enrollment
Prerequisites
- Verify your enrollment URL. Please replace the 'cn' portion of your console URL with 'ds' (e.g. Enrollment URL for https://cn1206.awmdm.com is https://ds1206.awmdm.com; Exception: AW400.awmdm.com)
- Before enrolling Android, you must first configure Android EMM Registration in Workspace ONE UEM.
- Verify you've added a user account, which is detailed in the above section.
First, you'll need to identify the Group ID for your sandbox. This information is found under Enrollment Details in the expanded Workspace ONE UEM tile in the TestDrive portal.
Now that you have your unique URL and Group ID, power up your device and download the AirWatch Agent from the app store.
Open the Agent and choose the Server Details option.
Enter your URL in the Server field, and then enter the Group ID. Click Next when finished.
Next, you'll be brought to the User Credentials page. Enter the Username and Password for the user account you set up earlier. Click Next.
At the bottom of the screen select Redirect and Enable, which will open up a browser to begin installing the management profiles to your device.
Click Allow.
Now, you'll be prompted to install the Device Manager profile. Click Install and continue through the prompts.
Next, you'll be redirected to the AirWatch Agent. Click Done to proceed.
Click Done to continue.
You will be asked to create a more secure passcode for the Hub.
The data and privacy policies are displayed. Click I Understand to proceed.
Here you are given an opportunity to help us improve and develop new app features and functionality through anonymous data sharing.
Your device now reports as enrolled.
If you go back to the Workspace ONE UEM Sandbox Admin Console, you'll see the device now appears in the list view.
For product documentation on how to use Workspace ONE UEM please refer to the Omnissa Product Knowledge base page found here.